Trustifi admin portal
Step 1 – Verifying the plan and user type
Navigate to the “My Plan” page and verify that your plan type is “PRO” and your access level is “Admin“.
Note: If you don’t have a “Pro” plan, or you do not have admin-level access, please contact support@trustificorp.com
Step 2 – Navigating to outbound plan settings
Open the “Outbound Management” section on the left-side navigation panel and click on the “Plan Settings” page.
Step 3 – Selecting “Your MTA” architecture
First, open the “Email Relay Integration” tab. Under “Sending Architecture“, switch from the default (“Via Trustifi MTA“) to “Via your MTA“.
Step 4 – Adding your domain and MTA
After selecting “Via your MTA”, a new window will open. In the input field, enter your domain (e.g. “mydomain.com”) and MTA. In the “Port” field enter the number 25, unless you know for certain that your MTA uses a different port to send/receive emails. When all fields have been filled, click on “Approve” to confirm.
Step 5 – Enabling the Email Relay
First, verify your domain and MTA have been save correctly. Once ready, click on the toggle to enable the Email Relay.
Step 6 – Copying the Email Relay key
After the integration was enabled, your secret key will be generated. You can click on the “copy” button to copy the Email Relay secret key for later use.
Microsoft Exchange Admin Center
Step 7 – Navigating to the Exchange Admin Center – Mail flow Connectors
Navigate to the “Exchange admin center” via the following link – https://outlook.office365.com/ecp/ After you have logged in, navigate to the “Mail flow” – “Connectors” page.
Step 8 – Adding new connector
In this section, you will have to create a new connector by clicking on the “Add a connector” button.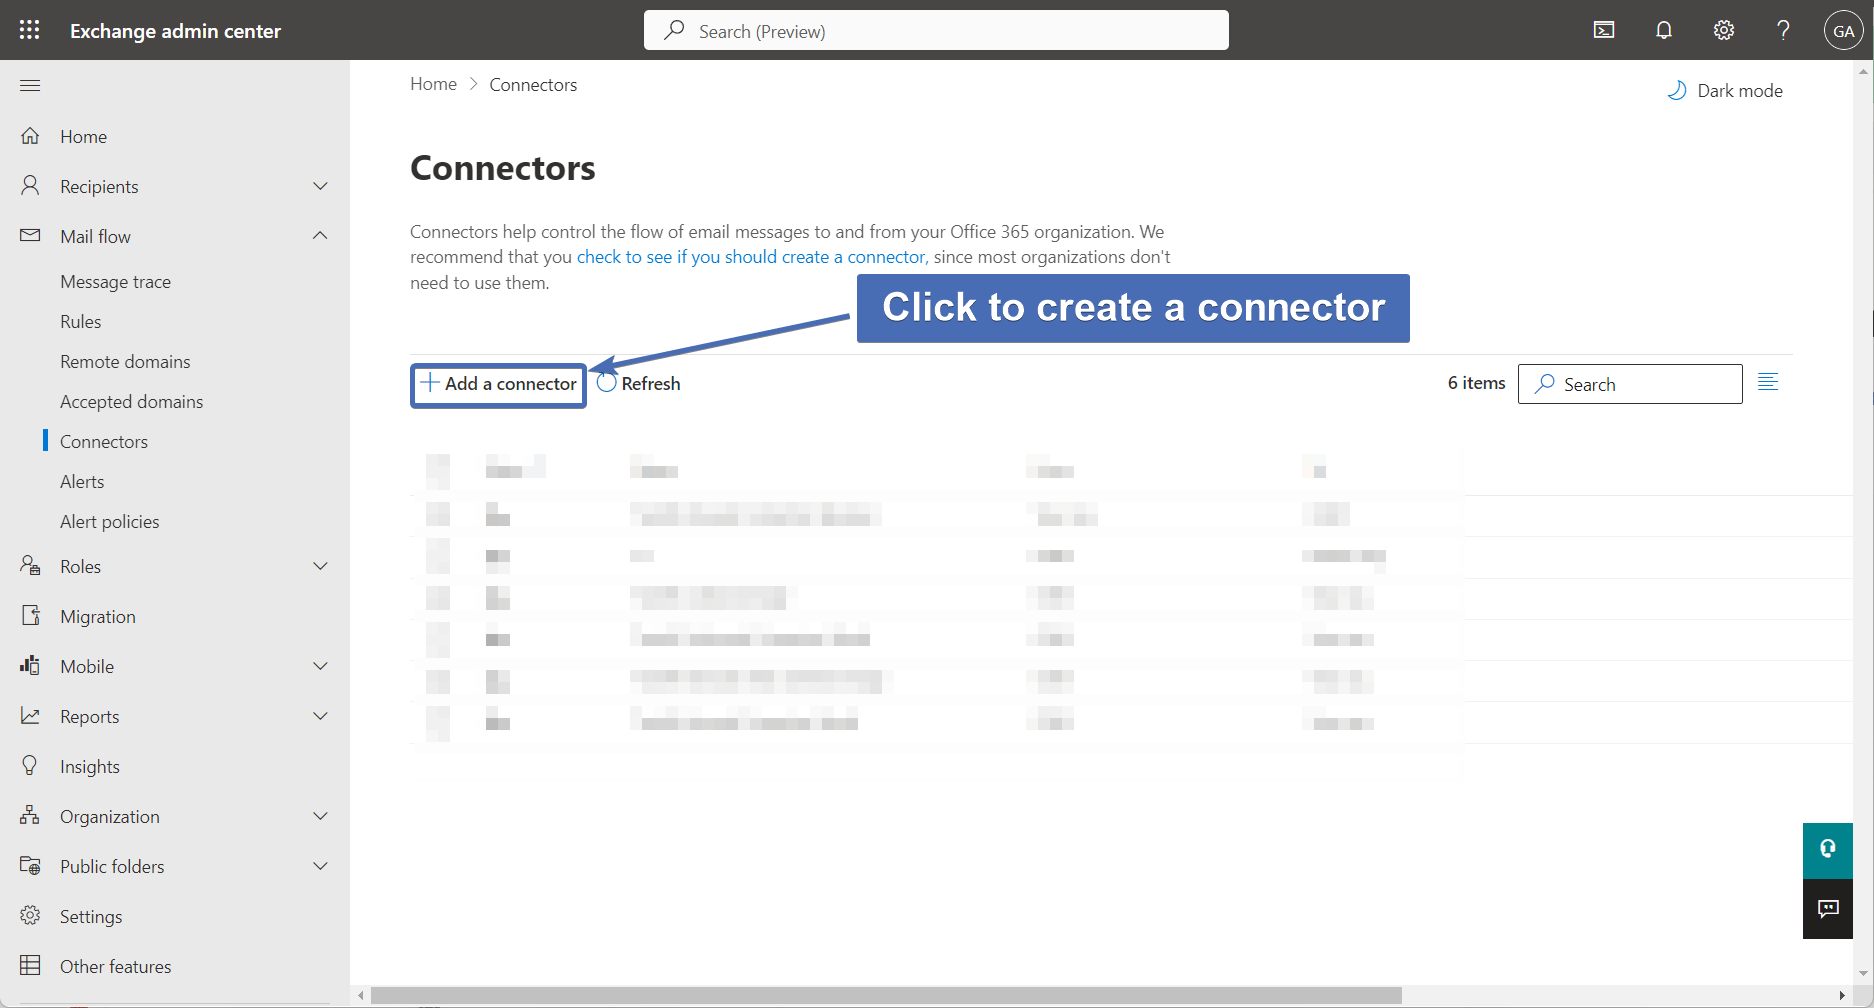
Step 9 – Selecting mail flow scenario

Step 10 – Naming and describing

Step 11 – Use of connector
Step 12 – Routing
Here we will need to add the smart host to which emails will be routed. First, select the option “Route email through these smart hosts“. Then, in the input field, add the following smart host: smtp.trustifi.com Then, click on the “+” icon to add the smart host and click “Next” to continue.step 13 – Security restrictions
Now we will need to configure the smart host security settings:- Select “Always use TLS” (First checkbox)
- Select “Issued by a trusted certificate authority (CA)”
- Check the box for “Add the subject name of subject alternative name (SAN) matches this domain name”
- Enter the following value into the input field: *.trustifi.com

Step 14 – Validating the connector
In this step, Exchange will need to validate the connector by sending an email through it. Enter an email for an active mailbox that’s on your email server, and click on the “Validate” button.
Step 15 – Validation results
After the connection check is done, a status of “Succeed” or “Failed” will appear for each of the validation tests. The “Check connectivity” test should succeed. If the status of this test has failed, please check that the smart host address was entered correctly. If the “Send test email” test fails, it’s OK. This is because we don’t yet have a rule set up to use this connector. Click on “Next” to continue. You may receive a warning – click “Yes” to confirm and continue.
Step 16 – Review and create connector
Here you will see a review of the connector settings. Make sure everything looks OK before clicking “Create connector“.
Step 17 – Creating the “receive” connector
First, verify the “Send” connector was created. Then, click on the “Add a new connector” button to open the “New connector” interface.
Step 18 – Selecting a mail flow scenario

Step 19 – Naming and describing the connector

Step 20 – Authenticating sent email
Here you need to select “By verifying that the IP address of the sending server matches one of these IP addresses that belong to your organization”. Add the following IPs and click on the “+” button to add each one:- 3.93.243.176
- 3.93.139.220
- 52.73.143.252
- 52.54.159.237

Step 21 – Security restrictions
Make sure the “Reject email messages if they aren’t sent over TLS” box is checked, then click “Next” to continue.
Step 22 – Reviewing the connector
Confirm that all settings are correct and finish by clicking on “Create connector”.
Modifying “Remote domains” settings
Step 23 – Navigating to the remote domains tab and editing the default
Note: For a detailed explanation of the required changes to “Remote domains“, please read this article. In this section, we will make some changes to the “Remote domains” settings. These changes are not strictly mandatory for the process, but will ensure that all types of email content are delivered correctly using Trustifi. First, go to “Remote domains'” under “Mail flow” and click on the default domain settings.
Step 24 – Editing the RTF settings
In the section that includes “Use rich-text format”, click on “Edit text and character set”.
Step 25 – Changing the RTF settings
Set the following:- Under “Use Rich Text format” – select “Never“
- Under “MIME character set” – select “Unicode (UTF-8)“
- Under “Non-MIME character set” – select “Unicode (UTF-8)“

Step 26 – Editing reply types
Under “Email reply types“, click on “Edit reply types“.
Step 27 – Changing reply types
Under “Out of Office automatic reply types” – select “Allow external and legacy out of office replies“. Then, click on “Save“.
Checking “Accepted Domains” settings
Step 28 – Viewing the “Accepted Domains” settings
First, navigate to “Accepted domains” under “Mail flow“. Find the domain you are configuring the Email Relay for, and verify that the “Domain type” is set to “Authoritative” and not to “Internal relay“.
Note: the “Internal relay” configuration is almost always used in situations where the domain has at least one mail server that is not synced with O365. If this is not the situation, the recommended configuration is “Authoritative“.
Modifying security settings
In this section we will need to make some modification to the O365 security policies to allow the Trustifi inbound IPs and make sure the emails returning from Trustifi are received successfully.Step 29 – Navigating to “threat policies”
First, log into the O365 security portal. Then, select “Policies & rules” from the left side navigation, and click on “Threat policies“.
Step 30 – editing the “connection filter policy”
Under “Threat policies“, navigate to “Anti-spam policies” and click on “Connection filter policy (default)” to edit.
Step 31 – enabling safe list and adding Trustifi IPs
In the pop-up, first click on “Edit connection filter policy“. Then, click on “Turn on safe list” and add the following Trustifi IPs to the top section (“Always allow messages from the following IP addresses or IP address range”):
- 3.93.243.176
- 3.93.139.220
- 3.251.32.127
- 54.195.145.1
- 52.54.159.237
- 52.73.143.252

Step 32 – navigating to “tenant allow/block lists”
Return to the “Threat policies” page, scroll down to the “Rules” section, and click on “Tenant allow/block lists“.
Step 33 – Adding an allow list
Under “Tenant allow/block lists“, click on the “Spoofed senders” tab and then click on the “Add” button to add an allow list.
Step 34 – Configuring the internal allow list
In the pop-up, perform these actions:- Add the Trustifi IPs in the following format: wildcard (asterisk), then comma, then a space and the IP. For example: *, 3.93.243.176 Add each Trustifi IP like this in a new line. Screenshot below. Note: Once all the IPs have been added, copy all of the rows since we will be creating a similar policy in the next step.
- Under “Spoof type“, select “Internal“.
- Under “Action“, select “Allow“.
- Click on “Add” to finish.

Step 35 – Configuring the external allow list
Click on the “Add” button to add a new allow list. In the pop-up, perform the same steps as before with one exception: In the “Spoof type” section, select “External” instead of “Internal“.
Creating a mail flow rule
Step 36 – Creating a new rule
Now we will need to navigate to the Rules tab to create a new rule to use the connector.
Step 37 – Naming the rule
First, name the new mail flow rule that will be used for the Trustifi outbound relay.
Step 38 – First condition: sender domain
Under “Apply this rule if“, select “The sender“. Then, in the 2nd menu, select “domain is“.
Step 39 – selecting the sender domain
Add the domain that will be used to send emails through Trustifi Email Relay. If you have multiple domains under your tenant, add them all here. After the domain(s) has been added, click on “Save“.
NOTE: Add here all the domains you want to be connected through the Trustifi Email Relay. In case you are adding more than one domain, make sure all of these domains have been verified in Trustifi.
Step 40 – Adding new condition
Add new condition by clicking on the “+” icon next to the first condition.
Step 41 – Second condition: sender location
Once again select “The sender” and select “Is external/internal”.
Step 42 – Selecting sender location
Under “select sender location“, choose “Inside the organization“. Then, click on “Save“.
Step 43 – First action: redirect to connector
Now we will start selecting the actions to be taken by this rule. Under “Do the following” – select “Redirect the message to” and then select “the following connector“.
Step 44 – Selecting connector redirection
Under “Select connector“, choose the Trustifi outbound connector which was created earlier. Then, click on “Save“.
Step 45 – Adding a new action
Add new action by clicking on the “+” icon next to the first action.
Step 46 – Second action: set a message header
For the new action, select “Modify the message properties” and then select “set a message header“.
Step 47 – Setting the header name
Click on the first “Enter text” link and add the following input: x-trustifi-creds Then, click on “Save“.
Step 48 – Setting the header value
Click on the second “Enter text” link, and there add the email relay secret key which you copied in step 6. Then, click on “Save“.
Step 49 – Adding an exception: sender IP
Here we will add an exception to this mail flow rule to avoid processing emails which have already been sent by Trustifi. This is to avoid email loops. Under “Except if“, select “Sender is” and then select “IP address is any of these ranges or exactly matches“.
Step 50 – Adding sender IPs
Add the following IPs:- 3.93.243.176
- 3.93.139.220
- 52.54.159.237
- 52.73.143.252

Step 51 – Continue to rule settings
Scroll down to the bottom of the window and click on “Next“.
Step 52 – Rule settings
Set the following additional settings:- Under “Severity” – select “High“
- Check the box for “Stop processing more rules“
- Check the box for “Defer the message if rule processing doesn’t complete“
- Under “Match sender address in message” – select “Header and envelope“

Step 53 – Review and finish
The next page will display a summary of the rule’s conditions, actions, exceptions, and settings. Make sure that everything looks OK and click “Finish” to create the rule.
Step 54 – Verifying the rule priority order
If you are also connected to the Trustifi inbound relay, you will need to verify the 2 Trustifi mail flow rules are in the correct priority order. To avoid issues with deliverability of internal emails, the Trustifi inbound mail flow rule has to come after the Trustifi outbound rule, as pictured below:
If the situation is incorrect, you can use the “Move up” / “Move down” arrow buttons to change the rule order.